> For the complete documentation index, see [llms.txt](https://docs.besmart.software/llms.txt). Markdown versions of documentation pages are available by appending `.md` to page URLs; this page is available as [Markdown](https://docs.besmart.software/design-data-management-and-exchange/classification-system/import-export-excel-tables.md).
# Import / export Excel tables
Importing and exporting classification tables as Microsoft Excel files is a great way to speed up the creation of classification systems.
This section explains step-by-step how to import a table. It then details how to set up a table in Excel according to the Classification System’s coding principles to ensure proper results when importing. Finally, it explains how to export tables easily.
[Download a sample Excel file >>](https://agacad.com/downloads/get/AOWhWflM9m)
### How to import a table?
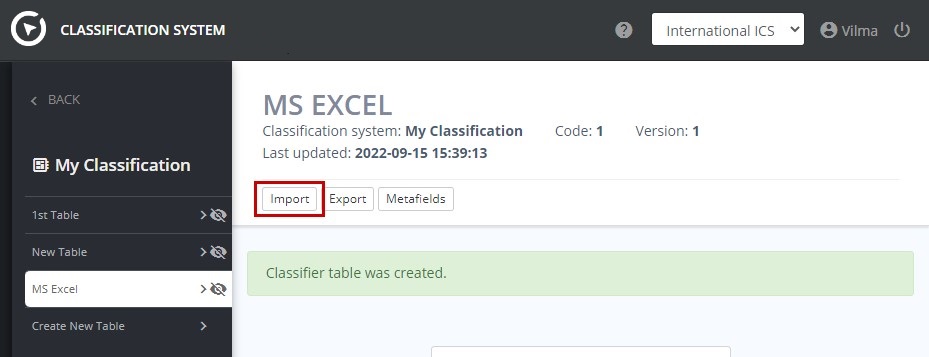
To begin, go to the “MS Excel” screen in the classification system where you want to add a table and click the "Import" button.
* Now click "Browse" and find the correct Excel file on your computer.
* Then click the "Import" button:

1. Now specify which sheet in the Excel file has the table to be imported. In this example, we want to import the “Table 1” worksheet.
2. Then click the "Proceed" button.

To properly map the Excel worksheet’s columns, each field type must be specified. The Classification System has five field types:

In the example shown, the Excel table includes:
1. Column A, “Full code”, with the full class code.
2. Column B, “Class”, with the 1st level classification code.
3. Column C, “Sub-Class”, with the 2nd level classification code.
4. Column D, “Sub-Sub-Class”, with the 3rd level classification code.
5. Column E, “Title”, with the item’s name.
6. Column F, “Synonyms”, with the keywords.
7. Column G, “Description”, with the item’s description.

You need to specify the field type for each Excel column. In the example, the field types for mapping would be as follows:

1. Finally, specify the row number where your classification data starts in the Excel worksheet.
2. Click "Proceed" to finish importing.

The program will confirm that the table has been imported successfully.

**If you get errors or the structure of your classification is incorrect, check your Excel table to make sure it complies with the Classification System’s coding principles. If the table’s structure is wrong, you may get duplicate tree names, or some items may be left out of the system.**
### How to set up a table in Excel (coding principles)?
[Download a sample Excel file >>](https://agacad.com/downloads/get/AOWhWflM9m)
To create a hierarchical structure, the program reads classification codes from the left to the right, as shown in the figure below. That is the first coding principle.

The second principle is that for each item in the table, there must be a corresponding parent code.

For the example shown, **the final result should look like this:**

### How to export classification table to an Excel file?
1. In the relevant classification system, select the table you want to export in the left side navigation menu.
2. Then simply click the "Export" button to export the table to a Microsoft Excel file.

---
# Agent Instructions
This documentation is published with GitBook. GitBook is the documentation platform designed so that both humans and AI agents can read, navigate, and reason over technical content effectively. Learn more at gitbook.com.
## Querying This Documentation
If you need additional information that is not directly available in this page, you can query the documentation by asking a question.
Perform an HTTP GET request on the following URL with the `ask` and `goal` query parameters:
```
GET https://docs.besmart.software/design-data-management-and-exchange/classification-system/import-export-excel-tables.md?ask=&goal=
```
`ask` is the immediate question: it should be specific, self-contained, and written in natural language.
`goal` is what the user is ultimately trying to achieve, the reason they need the answer. Sharing it helps GitBook give you a better, more relevant answer. A goal is most helpful when it describes the outcome the user wants rather than restating the question. For example, with `ask=how do I create an API token`, a goal like `automate deployments from our CI pipeline` lets GitBook tailor the answer to that use case.
The response will contain a direct answer to the question and relevant excerpts and sources from the documentation.
Use this mechanism when the answer is not explicitly present in the current page, you need clarification or additional context, or you want to retrieve related documentation sections.
 To begin, go to the “MS Excel” screen in the classification system where you want to add a table and click the "Import" button.