> For the complete documentation index, see [llms.txt](https://docs.besmart.software/llms.txt). Markdown versions of documentation pages are available by appending `.md` to page URLs; this page is available as [Markdown](https://docs.besmart.software/3d-modeling-and-design/precast-concrete/feature-descriptions/column-reinforcement/configuration-settings/round.md).
# Round

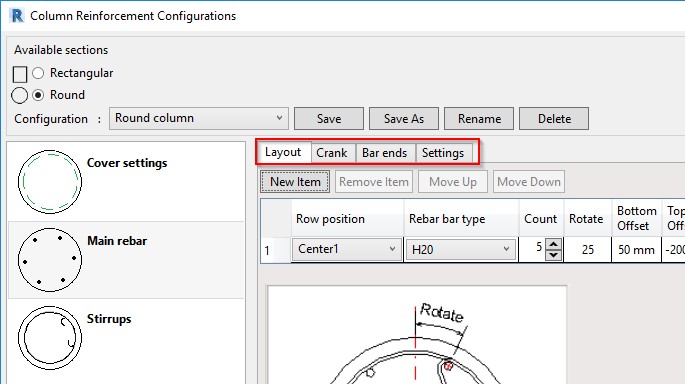
In the Main rebar window, there are 4 tabs:
* **Layout** – define reinforcement settings
* **Crank –**[ **read about it here.** ](/3d-modeling-and-design/precast-concrete/feature-descriptions/column-reinforcement/configuration-settings/main-rebar-crank.md)
* **Bend –** [**read about it here.** ](/3d-modeling-and-design/precast-concrete/feature-descriptions/column-reinforcement/configuration-settings/bend.md)
* **Settings** – pick some common settings, like view in Solid, Partition, etc.
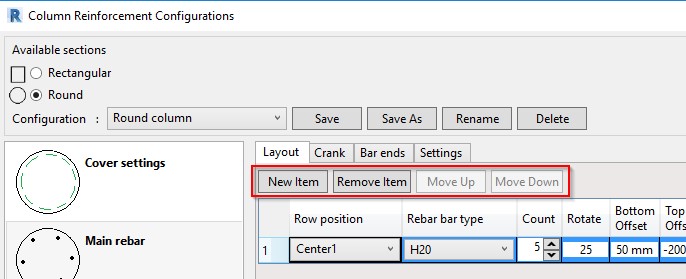
In the **Layout** tab, use the **New Item** button to insert as many rows as needed. Use the adjacent buttons to move a row up or down or to remove it.
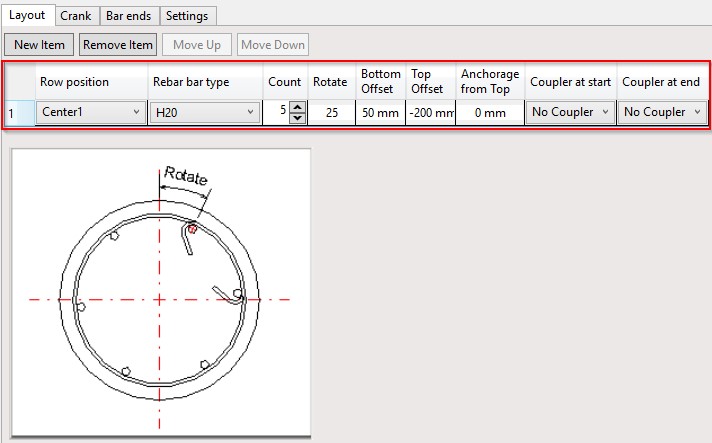
Looking at the column headers of the table in the **Layout** tab, there are different options (see table column headers) when inserting rebar. Let's go through each:
* **Row position** – for round columns, only one option is available – that is, Center1 – so just pick it. Instead of deleting a whole row, you can set to None in some situations.
* **Rebar bar type** – Select rebar Type from available bar types in your project. If you don't have them, first load them into the current project.
* **Rotate –** by default the first rebar is created at Top-center of the column and subsequent bars divide the circle equidistantly. By changing the Rotate parameter value, you can change the position of the starting point of rebar distribution.
* **Count** – how many bars should be distributed around the column with equal distances between them
* **Bottom offset/Top offset** – rebar offset from bottom/top of the column. May be positive or negative: a negative extends bar outside the column, a positive inside.
* **Anchorage from Top** – replaces Bottom offset value and bottom of the bar will be calculated from the top face of the column. Use this setting if you need short rebar elements at the top of the column.
* **Coupler at start/end** – add coupler at rebar start/end. The appropriate coupler family must be selected.

---
# Agent Instructions
This documentation is published with GitBook. GitBook is the documentation platform designed so that both humans and AI agents can read, navigate, and reason over technical content effectively. Learn more at gitbook.com.
## Querying This Documentation
If you need additional information that is not directly available in this page, you can query the documentation by asking a question.
Perform an HTTP GET request on the following URL with the `ask` and `goal` query parameters:
```
GET https://docs.besmart.software/3d-modeling-and-design/precast-concrete/feature-descriptions/column-reinforcement/configuration-settings/round.md?ask=&goal=
```
`ask` is the immediate question: it should be specific, self-contained, and written in natural language.
`goal` is what the user is ultimately trying to achieve, the reason they need the answer. Sharing it helps GitBook give you a better, more relevant answer. A goal is most helpful when it describes the outcome the user wants rather than restating the question. For example, with `ask=how do I create an API token`, a goal like `automate deployments from our CI pipeline` lets GitBook tailor the answer to that use case.
The response will contain a direct answer to the question and relevant excerpts and sources from the documentation.
Use this mechanism when the answer is not explicitly present in the current page, you need clarification or additional context, or you want to retrieve related documentation sections.